Project Editor
The Project Editor provides the user interface for editing Projects in Report Commander. After you have created a Project in the Project Editor, you can automate its execution using the Project Runner.
The Project Editor allows you to edit one Project at a time. If you need to work on more than one Project at once (for example, to compare or copy settings), you can start more than one instance of the Project Editor.
See the Project Tutorial for a step-by-step guide to creating a Project in the Project Editor.
Project Workspace
The Project Editor workspace consists of the following main components:
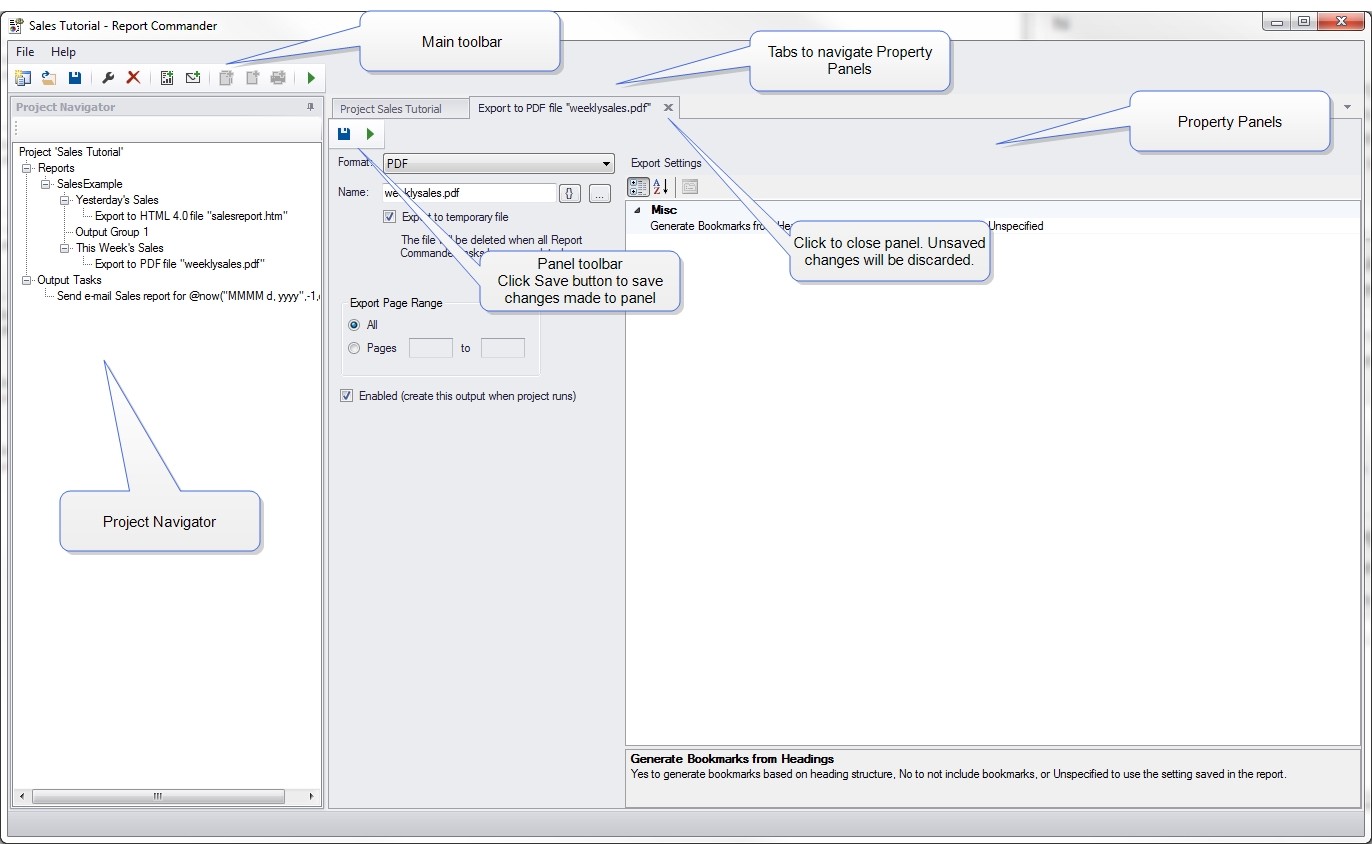
Project Navigator
The Project Navigator shows the structure of the Project: all of the Reports, Output Groups, Outputs, and Tasks in the Project.
When you select an item in the Project Navigator, you can right-click to get a menu of available commands, some of which are also available from the Main Toolbar.
To see the properties (settings) for an item, click its name and use any of these actions to open the Property Panel:
- Double-click the item
- Click the Properties (
 ) button in the Main Toolbar
 - Right-click the item and select Properties...
Main Toolbar
The Main Toolbar contains buttons that perform actions on the project as a whole or on the selected item in the Project Navigator.
The standard commands on this toolbar are:
-
 Create a new Project
 -
 Open a Project
 -
 Save the Project
 -
Show the Property Panel for the item selected in the Project Navigator
-
 Delete the item selected in the Project Navigator
 -
 Add a new Report to the Project
 -
 Add a new E-Mail Task to the Project
 -
 Add a new Upload Task to the Project
 -
 Add a new Output Group to the selected Report
 -
 Add a new File Output to the selected Output Group
 -
 Add a new Print Output to the selected Output Group
 -
 Execute the Project
Property Panels
The Property Panels show the properties (settings) for the various components of the Project. Each item that you open from the Project Navigator will be displayed as a separate panel with its own tab across the top.
An open panel behaves similarly to a window with an OK button: Changes you make on the panel are not saved until you click the Save button () on the Panel Toolbar. If you are working in a panel and change your mind about the changes you have made, you can click the Close button ( ) on the panel's tab to close the panel without saving the changes.
When you click the Save button on the Main Toolbar (or select Save from the File menu), Report Commander saves all open panels before saving the Project.
Panel Toolbar
The Panel Toolbar is a small toolbar at the top of each panel (below the panel tabs). The buttons on the panel toolbar act only on the open panel.
Working with Projects
When you start the Project Editor, it displays an empty Project that you can begin working with, or you can use the commands on the File menu to open an existing project or create a project from a command-line mode command line.
Changes you make to the Project are not saved until you use the Save button () on the Main Toolbar or the Save command from the File menu.
See the Project Tutorial for a step-by-step guide to creating a Project in the Project Editor.
The basic workflow for working with a Project is:
- Add a Report to the Project and set the login information in the Report Properties.
- Add an Output Group to the Report and set the report parameters in the Output Group Properties.
- Add an Output to the Output Group and configure the settings in the File Output or Print Output Properties.
- Repeat step 3 as necessary to add additional Outputs (additional exports or print runs using the same parameters).
- Repeat steps 2-4 as necessary to add additional Output Groups (additional outputs using different parameters for the same report).
- Repeat steps 2-5 as necessary to add additional Reports.
- Save and test the project.
Testing Your Project
At any time while you are editing your Project you can click the Run button (![]() ) on the Main Toolbar to have Report Commander execute the project. When you click this button, Report Commander will execute the project exactly as if it were being run in unattended mode: it will produce all outputs (print and export) and execute any tasks (such as sending e-mail) that are configured for the Project.
) on the Main Toolbar to have Report Commander execute the project. When you click this button, Report Commander will execute the project exactly as if it were being run in unattended mode: it will produce all outputs (print and export) and execute any tasks (such as sending e-mail) that are configured for the Project.
You can preview and test individual Reports and Outputs using the options available on their property panels.